
Maintaining and Replacing Your Deck

Your deck needs to be regularly maintained to protect it from splinters and mildew. Minor stains are easy to clean, but rotted wood support posts or beams must be replaced.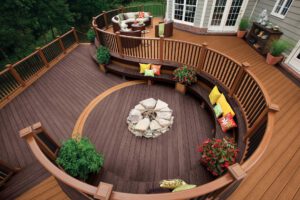
Tools you will need to do the job include a tape measure (for measuring replacement railings or planks), a shovel, a circular saw, and a cordless drill. However, if you need some professional help, you can contact Pro Deck Builders Charleston.
Preserving the surface of your deck is an important part of a well-maintained outdoor living space. The best way to do this is by staining, a process that adds color and also protects the wood from sun damage. A good-quality, transparent, or semi-transparent stain will keep your deck looking new for years to come. Before staining, make sure the deck is clean and dry, preferably during warm, dry weather.
All-purpose cleaners may be sufficient for a quick cleaning, but you’ll likely need something stronger for an older deck with more extensive stains and abrasions. Try trisodium phosphate (TSP), which is sold in powdered form and must be diluted with water before use; follow the product instructions for the correct ratio. You can also try commercial wood cleaners that are specifically designed for pressure-treated decking, many of which contain a mildewcide to help prevent mildew buildup.
Once the deck is clean, a light, penetrating stain should be applied. A good-quality product, such as Armstrong Clark, will not only protect the wood but also condition it by releasing a special ingredient that replaces the natural oils lost through weathering and sun exposure. This helps to prevent drying and brittleness as well as rejuvenate the cell structure for a better look and longer life.
Staining should be done regularly to keep your deck in pristine condition. If you’re going to do it yourself, a synthetic brush or roller should be used to apply the stain, following the grain of the wood as you go. It’s also a good idea to apply a topical sealer to further protect the surface from moisture.
To keep a wood deck in its best shape, consider moving rugs and furniture to avoid trapping moisture under them, and remove any items that tend to attract insects like weeds, mice, or birds. Lastly, trim any nearby bushes or trees to reduce the risk of them becoming a hiding place for moisture-loving plants. In addition, you should inspect the deck frequently for structural integrity, signs of insect infestation, and rot. Regular inspections will help you address issues before they become serious problems.
Sealing
Moisture is a deck’s biggest enemy, and if the wood becomes too saturated, it can cause rot. Sealing keeps moisture away and helps extend the life of your deck. We recommend resealing your deck every one to three years.
A deck should be completely dry before you apply a sealant, and you’ll want to take the time to scrub it down using a wire brush or pole sander to remove any dirt or mildew. If your deck has an existing layer of sealant, you may need to lightly sand it with 80-grit paper or a pole sander. This will remove any flaking and splinters and make the surface smooth enough to absorb a new coat of sealant.
Once your deck is clean, you can choose from a variety of sealants. Clear sealants provide a protective barrier while preserving the natural color and grain of your deck’s wood. However, they don’t offer optimal protection against the sun’s UV rays. Semi-transparent or tinted stains offer the same basic protection as a clear sealant but with added color. Solid stains cover the natural wood grain with color and are available in many different hues to match your deck’s style.
If you’re unsure whether your deck needs to be resealed, you can test its current condition by pouring a few drops of water onto the surface. If the water beads on top instead of soaking into the wood, your deck is currently sealed and in good condition.
When you’re ready to reseal, you can use a roller or a paint brush. A brush is slower, but it will force the sealant into open pores and the cracks between boards. Work on three or four boards at a time, and don’t forget to get into the joints where boards butt together. Be careful not to apply too thick a coat, as this can peel and chip.
While your deck is drying, you’ll need to put up yellow caution tape and keep family members and friends off of it. The sealant will take a minimum of 24 hours to fully cure, and disrupting this process can reduce its effectiveness. It’s also important to let the deck rest for two days before moving any furniture back on it, so that you don’t scratch up your new coating of protection.
Painting
Whether or not you stain, a deck needs to be protected with a clear water repellent to keep wood from drying and cracking. It can also help protect against mildew and moss. A good sealer is a must for high-traffic areas, and it should be repeated every other year or so. A stout mixing paddle is helpful for thoroughly mixing resurfacing paint. A sprayer is convenient for quick application, but a brush can provide more control and precision, especially around the deck railings and posts.
Deck boards can warp or rot due to water, rock salt used to melt snow and ice, or just general wear and tear. You can sometimes repair minor damage yourself by nailing in replacement planks, but if the deck is seriously warped or rotten, the structural joists will need to be replaced. Before you attempt this, rent a power washer ($70 daily) to remove any built-up dirt and mildew on the surface. Then use a stiff-bristle brush to scrub the boards and rinse.
If your deck has a lot of iron buildup or dark brown tannins, try oxalic acid. It can be found in some household cleaners and is effective against these types of stains. Follow the manufacturer’s instructions for proper usage. It is important to protect yourself from concentrated chemicals by wearing rubber gloves and eye protection. Also, be sure to cover nearby plants with plastic sheeting to prevent them from being damaged by the cleaning solution.
The vertical parts of a deck, such as the railings and posts, don’t get much sun or collect moisture. However, a deck post’s footer and the area around the mounting bolt can rot due to moisture that gathers underneath. These areas can be treated the same as a deck board with an appropriate stain and waterproofing product. To avoid a drab and faded appearance, stain or paint the deck railings and posts once a year or so, just as you do with the board surfaces. A stout brush or sprayer is useful for this application, but you should also use a soft brush to apply the product.
Repairing
After a year of exposure to the elements, decks often need some TLC. While minor stains and splinters are a sign of age and don’t necessarily require replacement, a damaged deck is a safety hazard that must be dealt with immediately. If left unchecked, the damage can spread quickly and lead to a collapsed, unstable deck that requires major repair or replacement.
Before starting repairs, it is a good idea to consult with experts to see how much it will cost to restore the deck back to its original condition. It may be less expensive than replacing the entire deck, especially if the rot is caused by something that could have been prevented, such as improper gutter drainage or flashing.
Decks that need extensive work will probably require a professional contractor to complete the project. It is possible to do cleaning and surface maintenance on your own, but any in-depth work that involves carpentry or stability issues should be left to professionals.
One of the first things that needs to be done before starting repairs is a thorough deck cleaning. The removal of dirt, mildew, and debris will allow you to get a clear view of the state of your deck. Any problems that aren’t immediately obvious should be addressed to prevent them from getting worse, such as a wobbly section or any areas where the wood is rotting.
If the joists or beams are rotting, it’s usually best to replace them rather than try to save the current ones. However, this can be a difficult job, especially if the beams are being held up by other joists. In this case, it’s often necessary to remove all the joists on that side of the deck to access the beams.
Replacing the joists themselves is also a fairly complex job that requires the use of power tools and heavy equipment. When replacing a joist, it’s important to make sure that the new one is a direct match in length, width, and depth to the old one. It’s also essential that the joist hanger, which is a galvanized steel or aluminum bracket that connects the joists to the deck’s ledger board and front structural beams, be replaced as well.